Set up network share
If you have upgraded an existing SPS 1.0 to SPS v3, you may already have a network share set up. If you do, you do not need to perform these steps unless you have migrated your SQL server used for SPS 1.0 to a new instance. You may also want to create a new network share that will be used in both SPS 1.0 and SPS v3 to fix security issues that may have been present in the old network share.
For the data import feature to work, SPS v3 needs to have access to a network share - a folder that is on any hard drive of the SQL server made accessible by network users. This network share is where the data files are uploaded for access by the SQL server.
The recommended location of the network share is on the SQL server itself. These instructions assume that the network share is on the SQL server.
Creating user accounts
To set up the network share, you need to create two user accounts: one for the SQL server and one for the web app server.
Creating user on the SQL server
The following instructions are created based on Windows Server 2019. The steps may vary slightly depending on the version of Windows Server you are using.
- In the Windows Start menu, find Computer Management and open it.
- In the three on the left, expand Local Users and Groups and select Users.
- In the panel on the right, click More Actions and select New User.
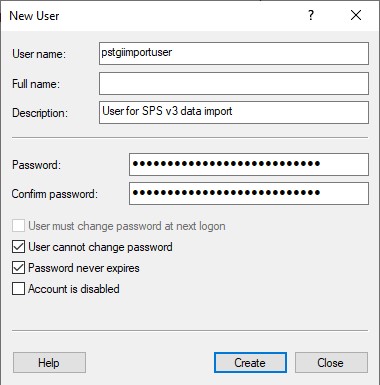
- For the User name, enter pstgiimportuser.
- For Description, enter User for SPS v3 data import.
- For password enter a complex password and confirm it. Remember it as you will need it for the web app server.
- Uncheck User must change password at next logon.
- Check User cannot change password.
- Check Password never expires.
-
Click Create.
- Click Close to close the pop up window.
Assigning the network user to the network share
The SPS v3 expects to be able to store and retrieve files from the network share. To allow this, you need to assign the user you just created to the network share.
- Select a location on a hard drive of the SQL server where you want to create a share folder.
- Create a new folder and name it /Imports.
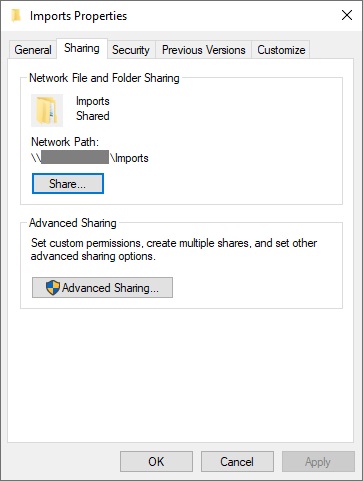
- Right-click on the folder and select Properties.
- Click on the Sharing tab.
- Click the Share button.
- In the input field, enter pstgiimportuser and click Add.
- In the list of users below, click on the pstgiimportuser user and select Read/Write as permission level.
- Click Share to close the window.
- Click Done to close the next window.
Make a note of the network path to the folder. It should be something like \\<server-name>\Imports.
You will need it to set it up in the SPS v3 System Configuration.
Assigning the SQL SERVER user to the network share
The SQL server needs to have access to the network share to read the files. To allow this, you need to give Read-only permission to that folder and its subfolders.
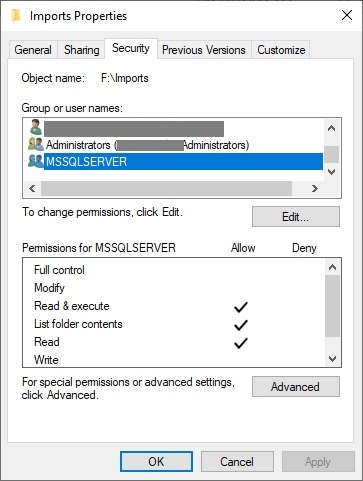
- Right-click on the /Imports folder and select Properties.
- Select the “Security” tab.
- Click Edit located under the top list.
- On the Permissions for Imports pop-up, click Add.
- Make sure that the name of the local server is selecred in the From this location.
- In the Enter object name to select enter NT SERVICE\MSSQLSERVER or NT SERVICE\MSSQL$xxx, where xxx is your SQL instance name.
-
Click Check Names button. If you see another pop-up, select the name and click OK.
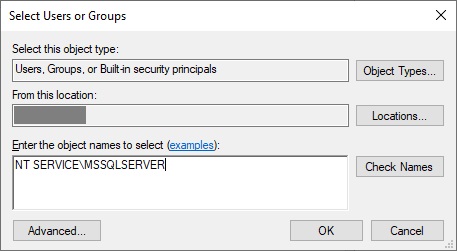
- Click OK to close the Select Users or Groups pop-up.
-
Make sure that on the Imports Properties pop-up, the user is selected and has Read & execute permission checked.
- Click OK to close the Imports Properties pop-up.
For more information, check Microsoft’s SQL Server documentation.
With this, you have set up the network share on the SQL server. The SQL server can read the files and the pstgiimportuser can write files to the network share.
IMPORTANT! The path to the network share you created must be set in the SPS v3 System Configuration before you can import any data. Set it after the application is installed and configured. For that, login to SPS v3 as an administrator and go to Administration > SPS Setup > System Configuration and set the path in the Import Folder field.
Creating user on the web app server
The web app server needs to have access to the network share to upload files. To allow this, you need to create a user with the same username and password as the user on the SQL server. Then, you need to set the App Pool of the SPS v3 - API to run as this user.
To create the new user on the web app server, follow these steps:
- In the Windows Start menu, find Computer Management and open it.
- In the three on the left, expand Local Users and Groups and select Users.
- In the panel on the right, click More Actions and select New User.
- For the User name, enter pstgiimportuser.
- For Description, enter User for SPS v3 data import.
- For password enter the same password you used on the SQL server.
- Uncheck User must change password at next logon.
- Check User cannot change password.
- Check Password never expires.
-
Click Create.

- Click Close to close the pop up window.
To add the user to the IIS_IUSRS group, follow these steps:
- Double-click the user you just created.
- Go to the Member of tab.
- Click Add.
- In the Enter the object names to select field, enter IIS_IUSRS and click Check Names.
- The group should be found and displayed. Click OK.
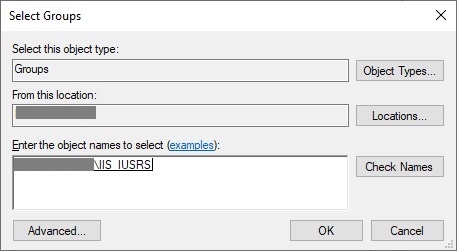
At this point, you should have a user with the same username and password on both the SQL server. It would also be a member of the IIS_IUSRS group, which will allow it to run the SPS v3 backend.
Assigning user to the App Pool
- Open IIS Manager.
- From Sites, stop the SPS v3 - API website, if it is running.
- In Application Pools, right-clixk SPS v3 - API and select Advanced Settings.
- Find the Identity field and click the … button.
- Choose Custom account, then click Set.
- Enter the username and password you have created with the steps above.
- Click OK to close the window and set the changes.
- In the IIS Manager, click Recycle to restart the App Pool.
- In the Sites section, start the SPS v3 - API website.
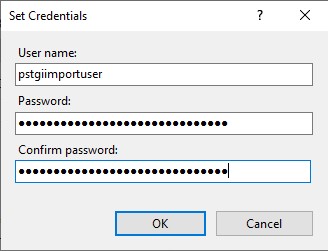
For SPS 1.0 to use the same import process and folders, you need to set the same user and password in the SPS 1.0 website on IIS > Advanced settings > Physical Path Credentials property.
At this point, you should have a folder on the SQL server that is shared on the network and that the web app server can access using the user account you created.
Troubleshooting
Application pool stops
If the Application Pool stops by itself after you set the custom user, check for errors in Event Viewer > Windows Logs > System. You may see errors like “Windows Process Activation Service (WAS) encountered a failure when it started a worker process to serve the application pool”.
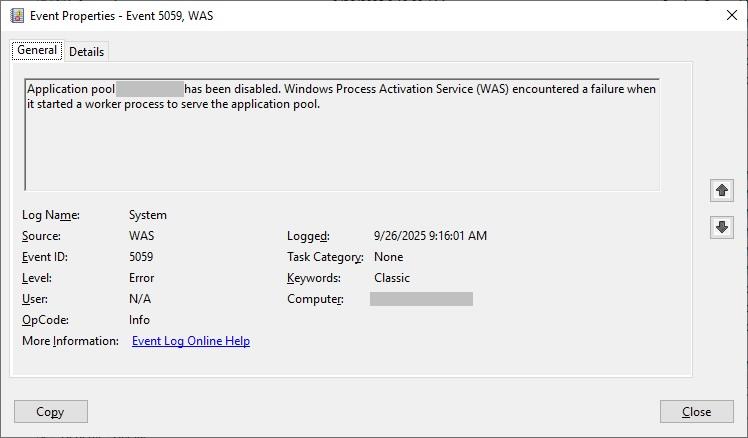
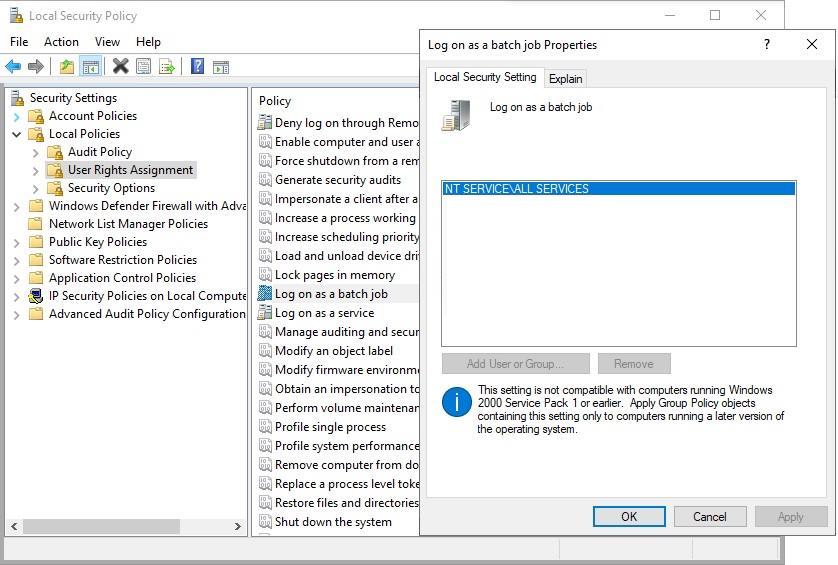
It usually means that the user you set does not have the permission to log in as a batch job (non-interactive login). To fix this, follow these steps:
- In the Windows Start menu, find Local Security Policy and open it.
- Go to Local Policies > User Rights Assignment.
- Find Log on as a batch job and double-click it.
- Add the pstgiimportuser user you created to the list.
Home / Next: Updating the SPS v3 application